What Do I Do With My Almond Milk Once I’ve Made It?

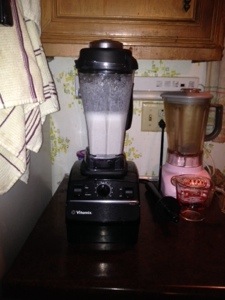
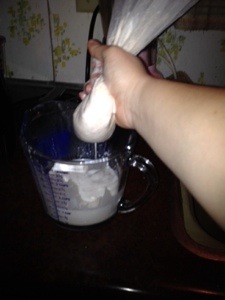
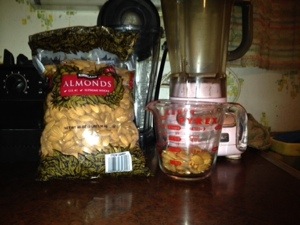
A friend asked me yesterday how the plain almond milk I’d made tasted. I told her it tasted like milk. I’ve been a vegan for two years and the taste of dairy milk is lost to me.

So I went to my husband, Pete Sawochka, the only vegetarian in the family who cannot give up dairy milk and cheese, and asked him to describe what dairy milk tastes like compared to my almond milk. Here’s what he said: “Well for one thing dairy milk not as sweet naturally. And if you’re talking about whole, dairy milk has a full, fatty flavor to it and the almond milk tastes a little water. Lastly there’s a taste in the main core flavor of dairy milk that’s just not there in almond milk. I would recommend sweetening the almond milk if a person is trying it for the first time.”

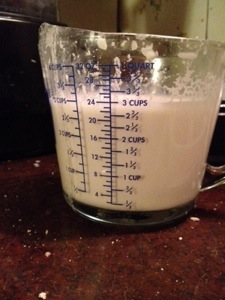
Pete is right. The taste of the almond milk is very bland with a very slight hint of almond in the background. If you’re trying almond milk for the first time, I recommend sweetening to start. One batch of almond milk we made yielded three cups. Add 1 or two tablespoons of either honey, agave nectar or other natural sugar and 1/2 teaspoon of vanilla extract. While the milk won’t have the fatty taste of the whole milk, the sweetness of the milk will make up for that filling, fatty, smooth flavor that is missing. As a side note, if you drink skim milk like I used to, the thinness that skim milk has is very similar to the flavor of plain almond milk.

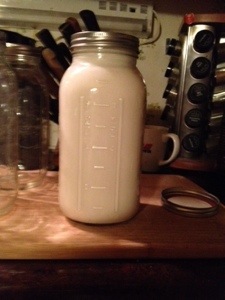
What can you do with your almond milk now that I’ve made it? I recommend you think of where you usually use dairy milk and replace it with almond milk. It’s great with cereal, works fabulously in a smoothie or replace it in a recipe that calls for milk in baking or cooking.

Here’s a super-chocolatey, sweet shake that is delicious and you can use your almond milk in it. In fact, I made my own almond milk for the first time last week in order to use it in this recipe and it worked out great. I did not sweeten my homemade almond milk because this recipe is already naturally sweet. Here’s the recipe:

Take 1 ripe avocado, 1 banana, 3-4 tablespoons of unsweetened cocoa powder, 2 or 3 dates pitted, 3 cups of almond milk and 5 or 6 ice cubes and blend the ingredients in a blender like we used to make the almond milk and enjoy! If you have a chocolate craving it’s awesome. And it makes enough to share a glass with family members!

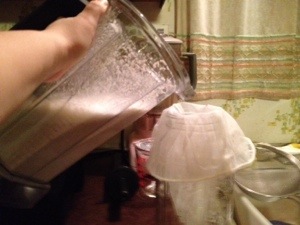
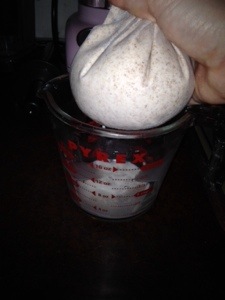
My last tip has to do with the nut pulp we were left with. I’ve read that the pulp makes a great gluten free flour for gluten sensitive or intolerant people. Take the nut pulp, crumble the nut pulp in a thin layer on a dehydrator sheet and dehydrate between four to six hours. Then blend the dehydrated pulp in a food processor or sift the flour after blending for a super fine texture.

I hope you enjoy the almond milk plain, sweetened, with some cereal for breakfast, in a smoothie or if you swap it out for dairy milk in a recipe.

Enjoy! Thanks for tuning in!

Sara Sawochka

Advertisement

Let’s Get Nutty—Making Almond Milk Day 2

Here we are on day 2 of making our own almond milk!

On day 1 we soaked our nuts to soften them to get them ready for the blender as you can see below. The nuts are soft so any sturdy blender will work. High speed blenders like the Vitamix or household blenders like my pink Kitchenaid will work!

20140221-220107.jpg

Other items you will need tonight besides a blender include cheesecloth or nut milk bag, colander, water and water.

Alright now let’s make our milk!

First, strain the almonds that were soaking into a colander. If you touch one you will notice how much softer they are now. Give the nuts a quick rinse with some fresh water.

20140221-220951.jpg

Second, put the nuts into the blender along with three cups of fresh water. Do not use the water you used for soaking—it’s dirty and you want to start fresh!

20140221-221141.jpg

Third, blend water and almonds together.

20140221-221435.jpg

Now you’ve got almond milk! How easy was that? Easy!

Here’s the last step. We need to clean our milk out a bit. We’ve got nut pulp in there. So now we will take a nut milk bag or some cheesecloth and put it over a bowl or large measuring glass to catch the milk.

Here’s cheesecloth from Home Depot:

20140221-221856.jpg

Here’s a nut milk bag I ordered from Amazon:

20140221-221948.jpg

I’m going to continue on using my nut milk bag. See below where I drape my bag over my large measuring glass:

20140221-222252.jpg

Take the blender and pour the milk out of the blender and into the container with the cheesecloth or nut milk bag. Do not overfill!

20140221-222738.jpg

Next pick up the sides of the bag and slowly lift the sides of the bag upwards and lift it out of the container:

20140221-223021.jpg

Last step is to softly squeeze the the bag and watch the nut separate from the nut pulp. You will start with a fat, puffy bag. When you’re finished squeezing the clarified milk out from the pulp you will have a super, skinny bag. See below.

Fat, puffy bag:

20140221-223329.jpg

Squeeze the bag softly at first. The milk will become projectile if you squeeze too hard.

20140221-223834.jpg

Super, skinny bag:

20140221-230903.jpg

All that’s left to do is pour your clarified nut milk into a storage container like a Mason Ball jar. Put the container in the fridge and let chill to use later.

Here’s the milk separated from the pulp:

20140221-224253.jpg

Here’s the pulp:

20140221-224340.jpg

Sexy nut pulp close up picture:

20140221-224415.jpg

The one cup of nuts soaked, blended with three cups of water and separated from the pulp gives you three cups of almond milk:

20140221-224623.jpg

If you want more milk then soak more nuts like we did yesterday and blend with the one cup of nuts and three cups of water ratio.

I got nutty and made lots of milk for myself!

20140221-224906.jpg

Last week it took me an hour and thirty minutes to make enough for the week. It’s so easy to make!

The milk tastes fairly bland because it is just nuts and water at this point.

Check out tomorrow’s final post on making your own almond milk and we will go over what you can do with the fresh almond milk you’ve created.

Thanks for getting nutty with me!

Sara Sawochka

Why Do You Love Me?

It’s nice to know you are loved. In this case it was so much better when I just asked about it instead of waiting for someone to tell me they loved me. But when the opportunity arose—I hesitated.

This year for Valentine’s Day, my friend Tim posted the following for his Facebook status:

“From now until Valentine’s Day, I am going to tell Facebook friends Why I love them. If you wish to be included, comment with “Why do you love me?” and I will tell you.”

When I first saw this I wasn’t sure what to think. Tim posted the above statement on February 12th which gave people a chance to respond. At first I hesitated and didn’t respond. I was afraid if I responded I would get a foolish answer. The thought of being publicly embarrassed in a virtual social venue terrified me. Stupid, huh? Not really when you think about it. No one really likes to be embarrassed—even the people that say they do don’t like it at heart. We want to hear good things about ourselves. We want to be appreciated. Anyways, I waited a few days before I responded with “Why do you love me?” to Tim’s post.

The reason I responded? It was because I saw the responses that were coming from Tim as other people responded. I noticed some people responded with doubt with responses similar to the following statement, “Well I don’t know if this is a joke or not, but what the heck…Why do you love me?”. It’s very similar to the reluctance I experienced. So I took a risk. I was loving the responses Tim was giving to his other friends so I asked, “Why do you love me?” and about a day later I received his response:

Tim wrote: “Sara Sawochka—I have loved you since you came to the Thanksgiving run I hosted in Crown Point. I think you came dressed as a pilgrim? To me, you just seemed too cool and that’s before I even knew you! Then I loved you for your writing and your passion (whether it was running or animals or any variety of topics) and your honesty! You would include things in your writing that were very personal and I admired you sooo much for being able to share so much of yourself. Then, you went to Comic Con and it’s an easy thing to make fun of, but I really think you genuinely appreciated it and that is where I got to know and love Pete Sawochka.”

To answer Tim’s post, I was at the Thanksgiving run which I thought was incredibly creative and so fun. I was not dressed as a pilgrim but I was there! See below:

Love at first sight!

Love at first sight!

Other than me not being dressed as a pilgrim, Tim hit the nail straight on the head!

And as for loving Pete Sawochka—no comment on the love between Pete and Tim! It’s between them! But let me tell you that these two really clicked at Comic Con.

Thank you so much for your kind words Tim. They meant so much to me. They made my day, my week and my month!

Don’t be afraid to ask for love like I was. Don’t hesitate. Go for it! It’s sooooo worth it to hear how you are loved. Love is all around!

Love,
Sara Sawochka

Let’s Get Nutty! Make Your Own Almond Milk

Hey, do you want to learn how to make your own almond milk?

Did you say YES??? I thought you did! So, here we go:

Day 1 requires 1 cup of unsalted, whole almonds, a glass container that can hold 3 cups of water, 3 cups of water and 12 – 24 hours to soak.

20140220-220957.jpgFirst, we will soak our nuts by taking one cup of almonds.

20140220-221441.jpgAny unsalted, whole almonds will work like. I like the unsalted, whole almonds from Costco.

20140220-222047.jpgPut the cup of nuts in a bowl or glass jar, fill the container with three cups of water and walk away. The nuts have to soak for preferably 12 – 24 hours to soften them up a bit for their future spin in the blender. Convenient, huh? That’s what I thought!

Here is a picture of 3 cups of water over 1 cup of nuts in a glass container.

The nuts will absorb the water so tomorrow when we make the milk we will have bigger, softer nuts! Go ahead and laugh because it’s both funny and cool!

Talk to you on Day 2 when we make our milk!

Sara Sawochka